 |
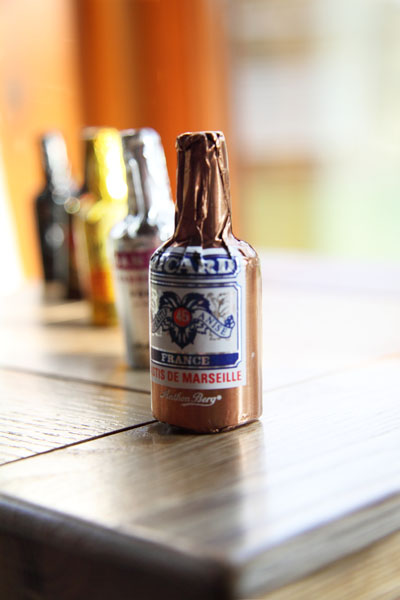
| Nature a violet hue on Flickr Depth of Field (Auto) 2010 |
University is my motivator, my teacher. I could have taught myself alone but then I would have missed out on the interesting projects and exclusive tips on how to make the best of yourself and your camera. One of the things I have always wanted to master is Depth of Field. Only now have I really understood what is shallow and what is wide and have a vague idea of the Aperture and Shutter speed that should be relevant. For me, Depth of Field changes a photograph immensely and gives it a professional touch and extra dimension. You can get this effect working on compact digital cameras but only so much. Upgrading to the SLR gives that opportunity to focus on the finite detail and though it can work perfectly fine on Auto mode, working with Manual gives you the upmost control of your camera.
 |
| Depth of Field (Manual) 1/100 sec f/5 |
 |
| Depth of Field (Manual) 1/100 f/5/6 |
When practicing Depth of Field, it is best to practice on some Still Life and Nature as they work really well and you get super close to your subject. This is also a good way of building up confidence and taking your time learning the best techniques before going for a portrait shoot and blurring out the eyes instead of the shoulders. Depth of Field is all about the focal length and the Aperture, not so much the Shutter speed (though it is still important).
I have done a few practices over the last few years and each time, I do see an improvement. This time I worked with some mini chocolate liquor bottles that I featured in my 365 day project at the end of January. Swapping my iPod for my Canon, I really wanted to make sure I had a good exposure first so it would only have to be tweaked in editing or not at all. I then had a few goes, moving the bottles around and moving my camera close and then a little further till I got a desired look which was a shallow depth of field. This means the a sharp foreground and a gradual or complete blur to the background. I played with the composition a little and technicalities of the camera, resulting in using 1/00 sec shutter speed and aperture ranging from f/5 and f/5.6.
Once you have completed your shoot, remember to always come back to it a few weeks or months down the line to see how much you have improved in that time by applying skills. Remember not to give up.
Want to visit my Flickr photostream with the featured photos in my blog and more then click the following link: http://www.flickr.com/photos/brown_eyed_dreamer/
No comments:
Post a Comment